


Hello, fantastic people!
This blog is 2nd part of our CSS Crash Couse↗️ in which we 're going to cover Grids, Flexbox & CSS Animations. Excited!!🚀
With Flexbox, the majority of layout issues can be resolved with a little amount of code. so headaches are a thing of the past. You'll receive a summary of all the properties you need to be mindful of in this post.
What is Flexbox? 🤔
It is a one-dimensional layout method for arranging items in rows or columns. It's a flexible box called Flexbox.
This layout makes elements
responsive, which means they change their behaviour depending on thetype of devicethat is displaying them. It gives elementsflexibilityas well as appropriatepositionandsymmetry.
let's understand with an example
Flexbox Elements
To start using the flexbox model, we first need to define a flex container.
<div class="flex-container">
  <div>1</div>
  <div>2</div>
  <div>3</div>
  <div>4</div>
  <div>5</div>
  <div>6</div>
  <div>7</div>
  <div>8</div>
</div>
Flexbox Properties
✒️ display
the flex container becomes flexible by setting the display property to
flex.container{ display: flex; }Output
flex-direction property
the flex-direction defines the direction of the container
✒️ column
.container {
  display: flex;
  flex-direction: column;
}
Output
✒️row
.container {
  display: flex;
  flex-direction: row;
}
Output:-
Now, let's talk about grids.
What are Grids? 😵
CSS Grid Layout is a two-dimensional layout system for the web. It lets you lay content out in rows and columns.
But how it is different from flexbox?
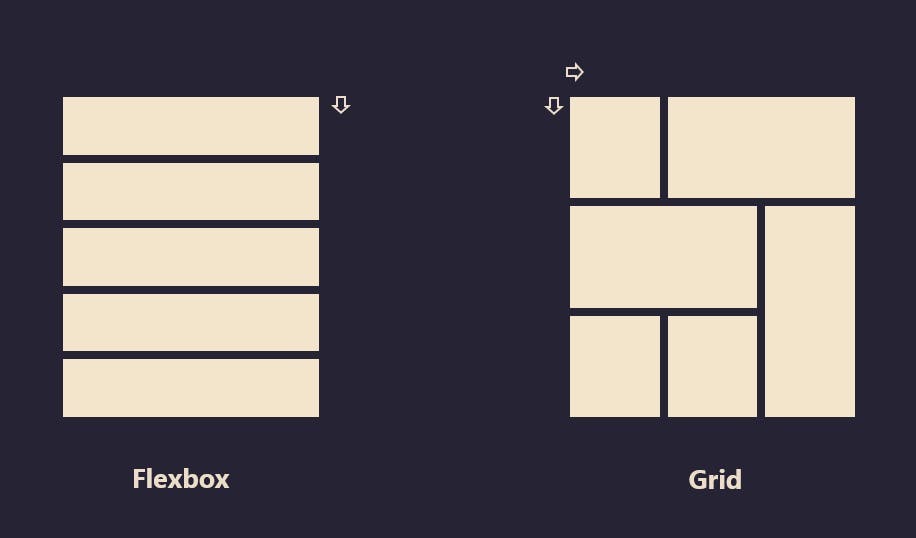
I hope you understand how flexbox and gride differ from each other.
Grid Elements
To start using the flexbox model, we first need to define a grid container.
<div class="grid-container">
  <div class="grid-item">1</div>
  <div class="grid-item">2</div>
  <div class="grid-item">3</div>
  <div class="grid-item">4</div>
  <div class="grid-item">5</div>
  <div class="grid-item">6</div>
  <div class="grid-item">7</div>
  <div class="grid-item">8</div>
  <div class="grid-item">9</div>
</div>
Grid Properties
✒️ display
.container{
display: grid;
}
Output
Grid-direction property
the flex-direction defines the direction of the container
✒️ column
.grid-container {
  display: grid;
  column-gap: 50px;
}
Output
✒️row
.container {
  display: grid;
  row-gap: 50px;
}
Output:-
Now, we are going to cover an exciting topic- CSS Animations🚀
CSS Animations
CSS Animations allow for the creation of animated visual effects on web pages using CSS styles and JavaScript. CSS animations are created using
@keyframes, which define the styles and changes in animation over time. The animation is applied to an element using theanimationproperty, which specifies the name of the animation, its duration, timing function, and other parameters. With CSS animations, you can create simple or complex animations, including changes in position, size, color, and more, to bring life to your web pages.
The animation timing function determines the acceleration and deceleration of the animation. You can choose from a range of built-in timing functions, such as ease, linear, ease-in-out, and more, or create your own custom timing functions. The iteration count specifies how many times the animation will repeat.
To create a CSS animation, you first need to define the keyframes for the animation using the @keyframes rule. For example:
@keyframes example {
  from {background-color: red;}
  to {background-color: yellow;}
}
Next, you apply the animation to an element using the animation property:
div {
  animation: example 5s;
}
In this example, the animation example is applied to the div element and will run for 5 seconds.
CSS animations can be used to animate various properties of an element, such as its position, size, color, and more. For example, you can create a bouncing ball animation by animating the top and left properties of an element:
@keyframes bounce {
  0% {
    transform: translateY(0);
  }
  50% {
    transform: translateY(-30px);
  }
  100% {
    transform: translateY(0);
  }
}

.ball {
  animation: bounce 1s ease-in-out infinite;
  background-color: blue;
  border-radius: 50%;
  height: 50px;
  position: relative;
  width: 50px;
}
CSS animations are a powerful tool for creating engaging and dynamic web pages. However, it's important to use animations judiciously and in moderation, as overuse can create a cluttered and distracting experience for the user.
In conclusion, CSS animations allow you to add visual interest and excitement to your web pages. Whether you want to animate a simple property or create a complex, multi-layered animation, CSS animations provide a flexible and easy-to-use tool for bringing your web pages to life.
Thanks for reading! Let me know if there's anything else I can help with.
I hope you loved this! Don't forget to support me by following.
Have a wonderful day💓.
Happy Learning and Coding.
#coderswhocode